Monday, August 30, 2010

With One Palette Again

I'm  going  with  the  Somerset  inspiration--with  one  palette again.  And  this  time  the colors  are  black,  white and  red.  Now  I  have  to  admit,  I'm  more  of   a  brown,  cream,  and  tomato  red  kind  of  girl.  But  when  I  was  organizing  my  art  room  last  week,  I  found  this  scrapbook  paper  that  I  had  forgot  all about.

This  is  a  Christine  Adolph  design  by  Creative  Imaginations,  and  all  of  her  designs  are  gorgeous.  And  I  know  why  I  bought  this,, because  I  knew  exactly  what  I  was  going  to  do  with  it--
It  was  hard  to  stick  with these  colors,  but  in  the  end  I'm  glad  that  I  did,  because  I'm so  happy  with  the  way  that  she  ended  up.   Actually,  it's  kind  of  easy  when  you only  have  3  colors  to  choose  from.   Okay,  and  I  just  realized  that  I cheated  a  little  with  her  face.  I  used  my  Caran d'Ache  crayons  and  I  can't  even  remember  all  of   the  colors  that  I used.   Oh  yeah--I  forgot  about  the  green  leaves  too--I  guess it's  not  that  easy   : )

And  when  I  was  at  the  Dick  Blick  store,  I  picked  up  one  of  my  favorite  very  very  deep  wrapped  canvases  that  happened  to  be  12 x 12 (same  size  as  the  scrapbook  paper),  with  no  thought  of  what  I  was  going  to  do  with  it.  I  love  when  things  like  this  happen.


And  how  about  that  large  glass  knob  on  top--got  it  at  the  Columbus  wholesale  show  for  only  $1.75!

And  here's  another  find--this  one  was  from  the  Highway  127  sale--


Glass   knobs  for  the  feet--these  were  only  $1.00.  Now  if   any  of  you  have  checked  prices  for   glass  knobs  for  cupboard  doors,  then  you  know that  this  was  a  good  deal!  These cigar  boxes  are  my  favorite   types  of  boxes  to  make,  because  at  one  time  they  were  at  a  tobacco  store  and  some  cigar-smoking  man  or  possibly  a  lady,  who  prefers  cigars,  purchased  this  box  and  with  no  reason  saved  the  box.  Don't  you  wish  you could  show  these  smokers   what  us  guys  do  with  these  boxes!

Also,  I  want  to  thank  Alison  for  featuring  me  on  her  website  Art-Of-Crafts.  This  is  a  great  site,  and  from  it's  own  words--"Art of Crafts  is  a  meeting  place for  everyone  who  loves  any  type  of  craft,  from  sketching  to  knitting  and  from  sewing  to  jewelry  making".  So  check  it  out,  and  you  can  see  my  interview  here.

Thanks  Ali--great  start  to  my  week!!

Friday, August 27, 2010

Packing Tape Transfer plus a Few Other Things

First  off--thanks  so  much  for all   of  your  encouraging  comments  on  my  metal  pieces--you  guys  made  my  week!   And  I  wanted  to  answer  the  question  a  couple  of  you  had  asked about  the  paper  punches--if  the  metal   will   dull   their  sharpness  or  break.  I'm  not  sure  if  it  will dull them  or  not  with  continued  use,  since  this  is  the  first  time  I've  done  this,  so  I'll  have  to  see  on  that  one.  The  one  thing  that  did  happen--was  with  the  flower  punch.  The  flower  punched  with  no  problem,  but  the metal  got  a  little  stuck  in the  prongs  in  the  punch  when  I  went  to  take  the  sheet  out.  I  just  cut  the  metal  away  and  pulled  the little  bits  of  metal  out.  It  wasn't  bad  enough  to  deter  me  from  making  more  metal  flowers.  I  love  the  way  these  turned  out.

And  also  a  few  had  asked  me  to  show  you  how  to  do  the  packing  tape  transfer--so  here  goes.  First  of   all,  it  won't  work  with  inkjet  copies, and  I've  only  done  the  transfers  with  magazine  or  glossy  catalog  images.  I  don't  know  about  lazer  or  photo  copies--has  anyone  tried  those?  So  I  wanted  to  show  you  3  different  images  from  different   types  of   books  to  see  if  there  was  any  difference  in  the  outcome  (kind  of  like  a  Science  experiment  back  in  elementary  school : )


I've  only  used  the  Scotch  brand  of  packing  tape  but  I  don't  think  that  it  makes  a  difference.  Starting  from  the  left--this  image  is  from  a  catalog--the  pages  are  thinner  which  makes  a difference  on  how  easy  the  transfer  comes  off.   The  middle  one  is  from  a  1949  magazine--the  ink  that  they  used  back  then  wasn't  as  good  so  the  transfer  isn't  as  strong,  and   the  paper  isn't  as  glossy, but  that  doesn't  seem  to  make  a  difference.  And  the  image  on  the  right  is  from a  current  magazine--acutally  it's  from  a  Somerset  mag.  I  wanted  to  use  a  magazine  that  had  high  quality  thicker  pages.  And  as your  looking  at  them  in  this  photo,  I've  already  put  the  tape  over  them.  You  just  put  the tape  on  top   of   them, and  then  cut   them  down  to  the size  of  the  tape--so  right  now,  they're  basically  in  a  laminated  state.  Make  sure  when  you  put  the  tape  on  them  that  their  nice  and  smooth  and  then   burnish  them  with  your  finger  or  a  credit  card,  which  is  what  I  prefer--burnish  them  good  so  you  have  a  complete  transfer.   Don't  tape  the  back  of  them!  And  make  sure  the  image  covers  all  of  the tape  but  doesn't  stick  out  past  the  tape.

Then  just  put  them  in  a  bowl  of  water  to soak--

Alot  say  that  they  only  have  to  be  soaked  for  about  15  minutes,  but  I  found  that  anywhere  from  45 minutes  to  an  hour  works  best  for  me.   You  just  take  them  out  one  at  a  time,  turn  them  over  to  expose  the  untaped  side,  and  just  start  rubbing  off  the  back  with  your  finger.

until  most  of  the  paper's  off--I  will  rewet  the  image  and  keep  rubbing  it  gently  until  it's  transparent.   I'll  also  put  them  under  running  water  and  GENTLY  continue  to  get  the  backing  off. Sometimes  all  of  the  backing  won't  come  off.  This  happened  to  one  of  the  transfers  and  I'll show  you  how  that  one  ended  up.

When  I'm  finished  with  them  I  pat  them with  a  paper  towel,  gently  again--because  they will   have  the  adhesive  from  the  tape  on  their  back  and  the  paper  towel  will  stick  to  them.  And  then  I'll  let  them  thoroughly  dry on  a  piece  of  wax  paper.  I  usually  do  a  batch  of  them,   and  I'll  store  them  in  a  plastic  baggie  in  a  single  layer.

So  what  I  did  was  decopauge  some  sheet  music  on  canvas  to  let  you  see how  they  look  over  it.  I  adhered  them  onto  my  canvas   with  matte  Mod  Podge  on  both  sides  (this  helps  get  rid  of  their  glossy  appearance,  because  they  end  up  glossy) or  if  you  want  to  keep  the  glossy  look,  just  use  the  gloss  Mod  Podge.  I  think  that  Matte  Medium  will work  also.  At  first  it  looks  milky,  but  it  dries  crystal  clear.  Here  are  the  results  of  my  little  experiment--


This  is  the  1949  magazine  image--like  I  said--a  little  faded,  but  still  pretty  good.

 
This  is  the  catalog  image  and  you  can  see  that  all  of  the  paper  didn't  come  off (the  white  residue).   But  sometimes  that's  what  you're  going  for--a  faded  shabby  look.

And  here's  the  Somerset  image.  This  came  off  the  best--should  have  known  because  it's  Somerset (Love  that  magazine!)

Here's  another  one  from  the  40's  mag.  I  really  like  the  black  and  white  image  over  the  text.  And  if  you  noticed  these  do  not  come  out  reversed,  so  that  means  that  you  could  do  text  transfers  too.  I've  also  read  that  for  bigger  pieces  you  can  use  clear  contact  paper  the  same  way  as  the  tape.  I  have  it--I've  just  never  tried  it--has   anybody  ever  tried  it?  For  some  reason,  I think  it  would  be  a  little  harder,  but  it  would  be  great  if  it  really  works--definitely  on  my  to-do  list.

I  hope  I  didn't  make  this  sound  too  complicated,  because  it  really  isn't.  If  you  have  any  questions--again  just  let  me  know.  And  it's  fun  to  experiment  with  different  images  and  then  using  them  in  your  artwork.  Some  you'll  like,  and  some  you  won't--so  try  it!

Now....I  want  to  thank  Jenny  for  this--


She  really  is  sweet,  and  I  want  to  thank  her  for  this  award--thank  you  Jenny!  Go  and  visit  her  creative  blog  here.

And  speaking  of  a  sweet  blog,  I  won  a  giveaway  from  Emma  Grace!--and  it  just  so  happens  that  I   found   it  in  my  mailbox  today!


This  is  from  her  Alice  in  Wonderland  series,  and  whoever  won  had  their  choice,  and  I  chose  the  Cheshire  Cat.  And  I  love  him!!--Thanks  Emma  Grace!   Your  blog  is  looking  good!!


And  finally,  it's  back  to  work  for  me.  I  have  a  show  in  2  weeks,  and  I  really  have  to  get  into  gear.  So  I  have  another  box  that  I  made.  After  I  made  this,  I  knew  what  my  next  box  was  going  to be.


Those  blocks  really  helped  make  this  box.  And  I  already  have  a  pretty  good  idea  for  my  next  box!

Tuesday, August 24, 2010

My Project With AMACO--It's All About the Metal

So  let  me  tell you  about  my  project!  About  a  few  weeks  ago,  Becky  from  AMACO  emailed  me  telling  me that  she  saw  on  my  blog  that  I  like  to  work  with  metal  and  asked  me  if  I  would  like  try  their  line  of  metals  called  ArtEmboss.  Well,  that  was  an  obvious  answer--of  course  I  would!!   So  she  sent  me  4  different  kinds.

Each  handy  tube  comes  with  its  own  embossing  tool  and pattern  sheet (I'll  tell you  about  those later)  and  the  sheets  are  9 1/4" x 12".  This  was  great  for  me,  because  the  only  metal  I've  worked  with  is  aluminum.  I  got  to  work  with  brass,  copper, pewter,  and aluminum.  My  overall  favorite  was  the  copper.  It's  easy  to  work  with,  very  durable (no  tearing  with  the  stylus),  and  when  you  put  black  paint  on  it  and wipe  it  back  off,  it  ends  up  with  a  wonderful  result.  But  the  pewter  was  my  favorite  to  work with  by  far.  It's  very  soft  for  a  metal  and  flexible  which  makes  it  very  easy  to do  whatever  you  want  to  it,  and  even  though  it's  soft, it's  very  durable.  My  least  favorite  was  the  brass.  It  seems  stiffer, and it  was  harder  to  adhere   to  my  surface.  I always  use  heavy  gel  medium  for  my  glue  for  metal,  but  I had  to  get  out  my  other  all  time  favorite  glue  for  the  brass.  The  name  of  this  glue  is  called  The  Ultimate  Glue (LOVE  it).  And   another  thing  that  has  me  very  excited    about  ArtEmboss  metal  is  that  there  are  also  7  other  different  colors  available,  and  I  most  definitely  see  these  in  my  future.  Make  sure  you  check  out  the  AMACO  website  for  more  info.

Becky sent   me a  very  ample  supply  of  metal,  so  I  decided  to make  2  pieces  of  art  from  it.  This  gave  me  an  opportunity  to  try  different  techniques  that  I've  never  tried  before,  so  this  was  a  great  learning  experience  for  me  also.    So  here's  basically  everything  that  I  used  for  my  metal  projects:

Starting  from  the  left--this  is  the  pattern  sheet  and  embossing  tool  that  comes  with  each  tube  of  metal.  The  tool  is  wooden  and  pointed  on one  side and  flat  for  smoothing out  the metal  on  the  other  side.  And  this  is  now  my  favorite  embossing  tool  to  use--it's  not  as  sharp  as  a  stylus  so  it's  easier  on  the metal.  Also  in  the  photo  are  stamps,  Staz on  ink  pad (that's  the  only  kind  that  will work),  punches (the  metal  punches just  like  any  paper--awesome!),  hard  plastic  embossing  plates,  plastic  stencils,  rub  ons,  acrylic  paints,  and  assorted  embossing  tools (love  that  hammer). Also,   below  the  pattern  sheet  you'll  see  that   white  square--that's  EcoArtBoard .  I  love  this  stuff--I  think  it  might be  made  from MDF (just  like  wood).    This  one  was   2" x 2"  but  they  come  in  assorted  small sizes  and  even  a  convenient  ATC  size.  You  can  find  it  here.  I  used   these  to  adhere  my  metal  pieces  to  and  I'll show  you  what  I  mean.

So  for  the  first  piece,  I  decided  to  make  a  sampler  using  the  2 x 2  pieces (EcoArtBoard).  A  great  way  to  start  out   if  you've   never  worked   with   metal   before.  And  remember,  you  can  use  regular  scissors  to  cut  it  with.  I  also  wanted  to  mention  that  when  you  emboss  metal,  it  works best  with  padding  underneath.  I  use  an old  mouse  pad--works  great.


I  used  my  stamps  with  Staz on  ink  for  both  of  these.  The  one  on  the  left  is  aluminum  with  copper  corners,  and  the  one  on  the  right  is  the  brass,  and  I  used  the  pattern  sheet  for  the  border.  All  you  have  to  do is  tape  down  the metal  (with  painters  tape),  and also  the  pattern sheet  on  top  of  it.  And  then  just  trace  the  pattern with  your  embossing  tool  onto  the  metal.  It  will  leave  an  imprint.  Then  just  take  your  embossing  tool  and  go  over  the  imprinted  metal  on  both  sides  to make  the  pattern  deeper.


On these two I used my heart punches. I've never used punches on metal before, and what was I waiting for?! I'm telling you, if you know how to use a paper punch, then you can do this. On the top one, which was copper, I collaged the lady on the Eco board (Old postage stamp--actually) and glued the metal over the image, and I also rubbed a little aqua/blue paint over the copper  (I  was  going  for  the  patina  look  on  this  one). I used the pattern sheet from AMACO again. And on the bottom one, I did the same thing with scrapbook paper, and put pewter over it and this was embossed with the embossing plate mold. And I want to mention again that I adhered all of the pieces (with a little help from my friend  The  Ultimate  Glue  for  the  brass)  with  heavy  gel  medium.


These  two  were  made  with  the  rub  on  butterflies--the  top  one  is  brass  and  the half- flower  was  made  from  the  embossing  mold.  And  the  bottom  one  is  pewter  and  the  heart  on  top  is  copper.  I added  some  metallic  bronze  paint  around  the  sides  of  this  one.  And  remember,   after  I  emboss the metal,  I   always  dry   brush  black  acrylic  paint  over  top  and  then  immediately  wipe  it  off,  so the  black  just  stays  in  the imprinted  part.


This  one  was  soooo  simple.  I  made  a  packing  tape  transfer   of  this  image  and  decopauged  it on  pewter  this  time  with  Mod  Podge,  and  then just  doodled  in  the  border.  If  you don't  know  how  to  do  a  packing  tape  transfer,  let  me  know--it's  so  fun--it's  addictive.

On  this  brass  piece,  I  used  my  stencil--very  easy, and  then  just  doodled  again  around  the  border.


And  finally,  on  these  2  copper  ones,  I just  basically  doodled  again,  except  for  the  bird .  I  found  a  sketched  image  of  a bird  that was  the  perfect  size,  so  I  traced  over  it.  When  I  finished  them  all,  I  sprayed  a  workable  fixative  over  them  and put  a  gloss  varnish  over  that.  The  varnish  will  tend  to  wash  away  the  black  paint,  so  the fixative  takes  care  of  that  problem.

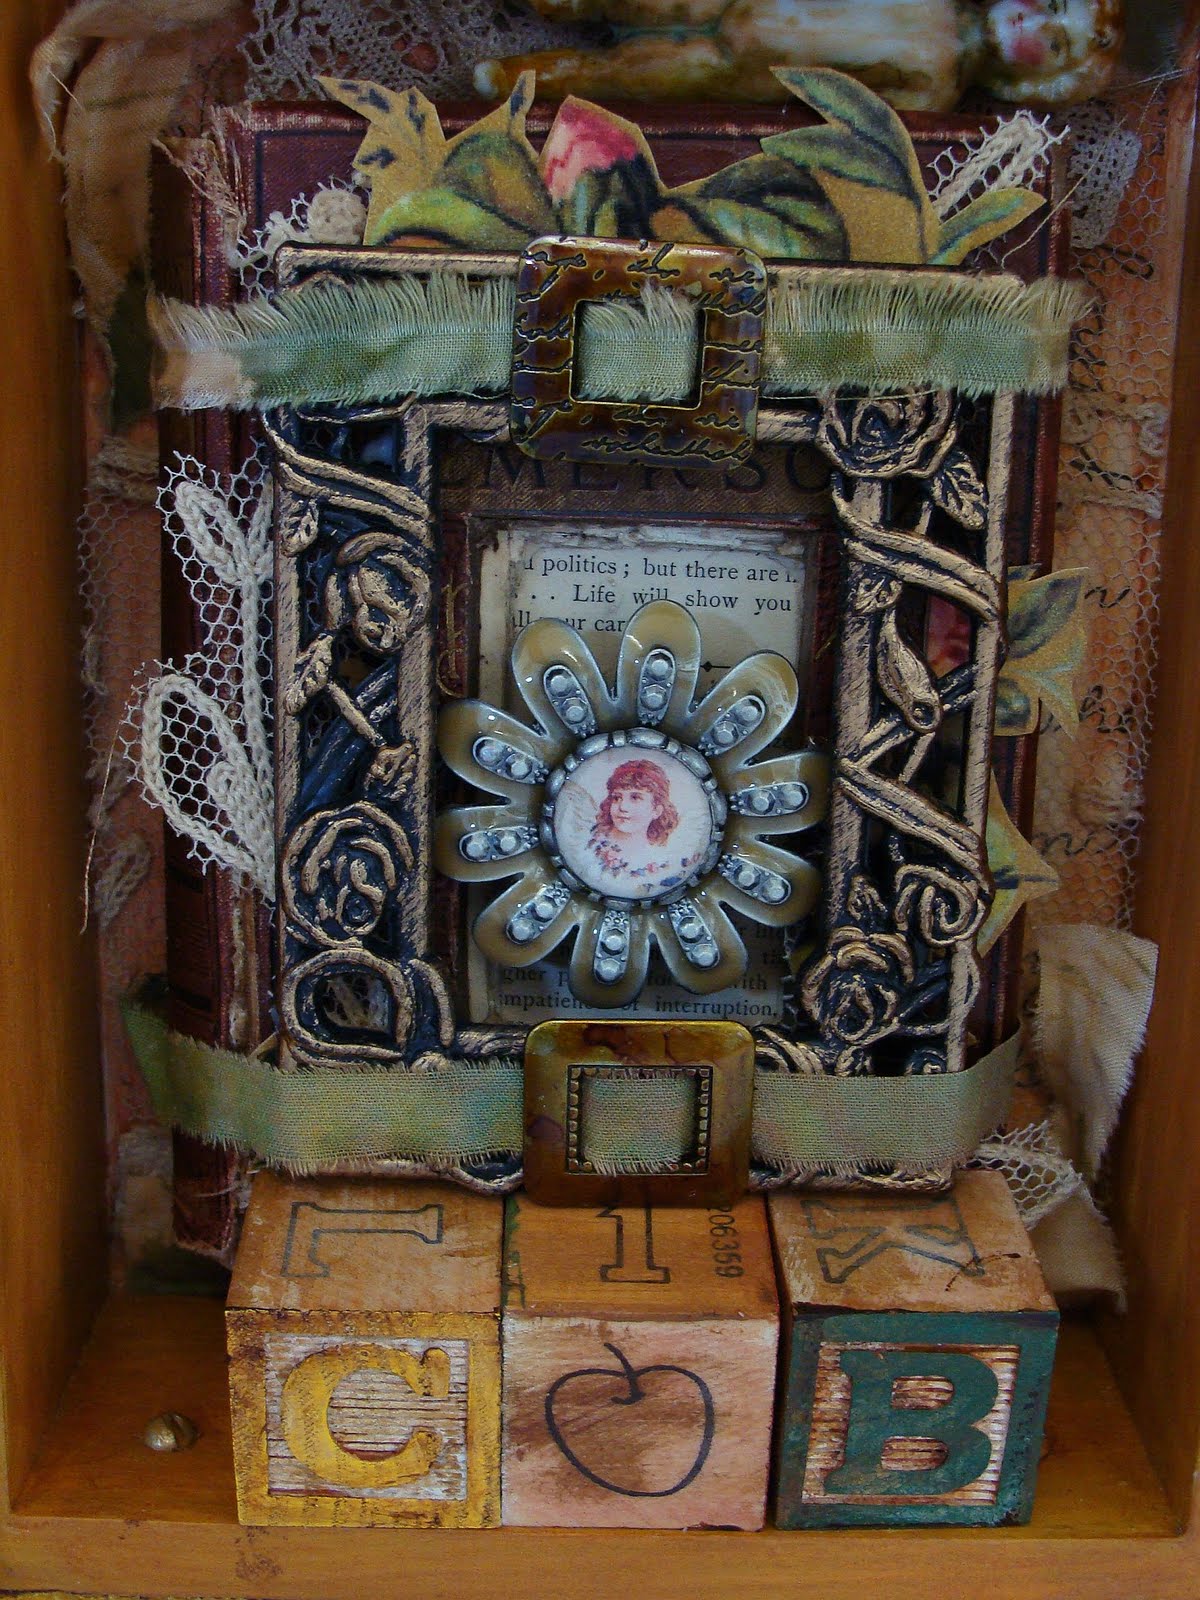
Okay,  so  now  comes  the  embellishing.  You  didnt  think  I  would  finish  these  without  embellishing  them,  did  you?!


And here's the finished piece--
 I  put  all  of  the pieces on  a  6 x 12 gallery  wrapped  canvas,  collaged  with  a  very  cool  glittery  scrapbook  paper.    I  have  to  say--I'm  very  proud  of  this  piece!


So  for  my  next  piece,  I  wanted  to  do  another  fun  technique  with  the  metal.  I  wanted  to  make  a  picture with  it.  I'll  show  you  what  I  mean.  I  started  out  with  a  6 x 12  gallery  canvas  again  and  made  my  background  on  it--


And  I  decided  to  put  a  vase  of  flowers  on  it.  I  used  my  flower paper  punch  to  make  the  flowers.

These  two  were  made  from copper  and  pewter,   and  in  the  center  of  them,  I  used  my  buttonhole  paper  punch  so  I  could  attach  them  together  with  buttons.  I  also  put  a  little  yellow  ochre  wash  on  the  pewter  flower.  You  could  also  keep  adding  more  layers  of  flowers  if  you  want  to.
 And  then  I  made  a  copper  vase (I  used  a  stencil  and  a  little  doodling  for  the  design) with  a little  of  the  aqua  paint  again  for  a  patina  effect.

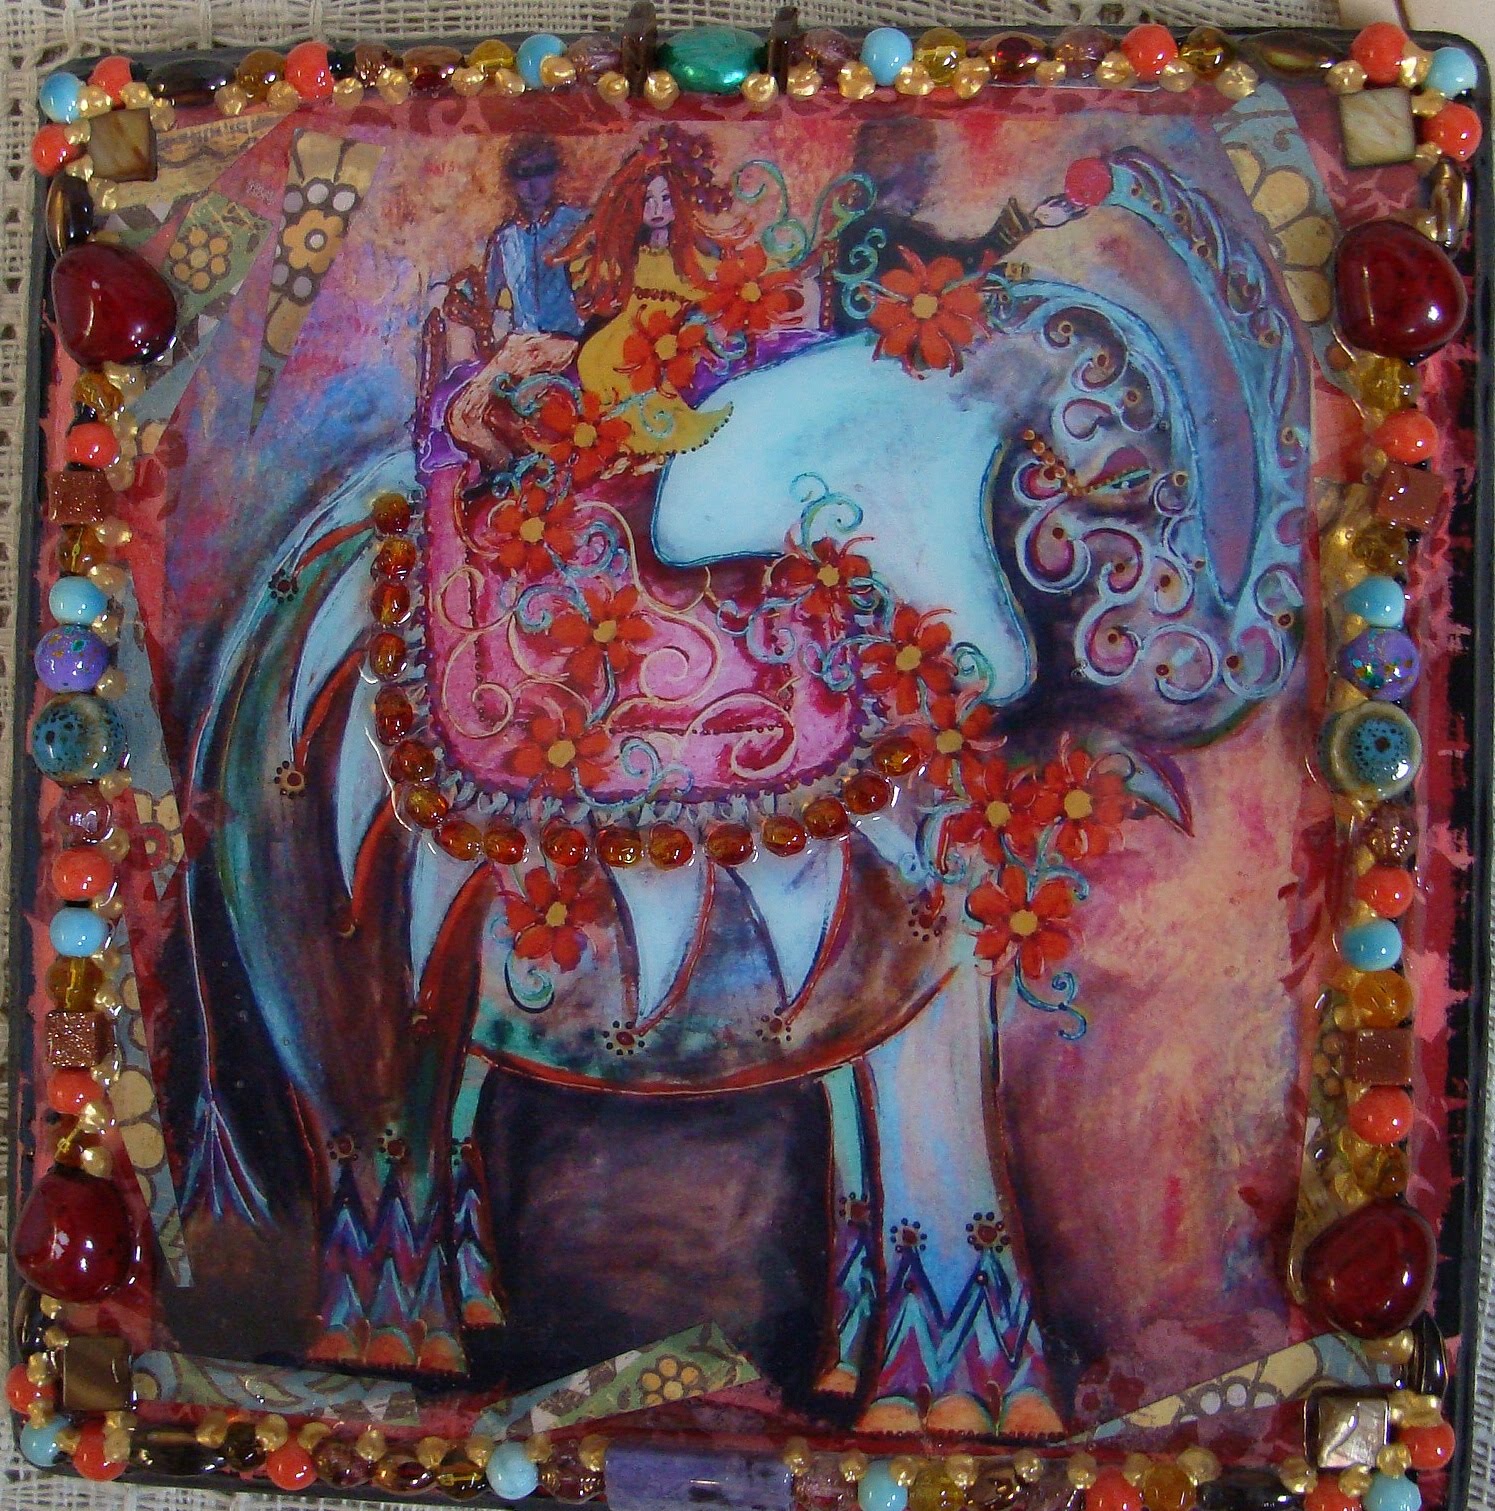
I  adhered  this  to  a piece  of  fun  foam  for  dimension--you  just  trace  the  vase  form  around  the  foam.  Another  thing   that  I  wanted  to  tell you  is  that  some  artists  will  reinforce  the  back  of  the  embossed  metal  with  plaster  or  wax  to  make  the  embossing more  stable.  I've  never  done  this,  but  it's  worth  a  try  if  you  want  to  take  the  time.  So  here's  the  final  result--

Another  piece  that  makes  me  smile!   So  in  the  end--it's  up  to  you  to  try  different  techniques--these  aren't  the  rules  of  embossing  metal--anything  goes.  And  the  only  learning  curve  that  you'll  have,  is  how  much  pressure  to  apply  to  the  metal  with  your  tool  which  is  pretty  simple.  In  the  end,  it's  just  another  collage  element  to  fool  around  with  and  add  to  your  mixed  media  pieces  or  jewelry  or  whatever!

 I'm  so  glad  that  Becky  from  AMACO  asked  me  to  try  out  these  metals.  I've  learned  so  much  more  of  what  I  can  do  with  metal,  and  because  of  that,  I  achieved  this--


Thanks  again  Becky!!

Sunday, August 22, 2010

Back From My Shopping Spree--A Little Poorer, but A Little More Organized....AND...another excellent giveaway that I want to tell you about!

I  have  to  say  that  I spent  alot  of  money  this weekend--way  too  much,  but  I  just  couldn't   resist--I was  finding lots  of  fun  things.  I  found  some  great  Christmas items  at  the  wholesale  show  for  collages.  When  I  do  the  Christmas  shows,  I mix  alot  of  craft  type items  with  my  mixed  media--but  I  DO  make  everything  that  I  offer  for  sale--I  don't  do  buy/sell--very  familiar  term  and  occurrence   in  the  art/craft  show  circuit.

And  my  first  stop  on  Friday  was  at  the  Dick Blick  store,  and  I  just  want  to  say--that  shopping  there  is    not  all   that  it's  cracked  up  to  be.   Now  before  you  start  screaming  at  me,  let  me  explain.  Okay,  the  first  reason  is  because  both  of  these  stores that  I've  been  to (Columbus  and  NYC)  were  huge,  and  very  overwhelming.   There's  so  much  to take in,  that  it's  almost  too  much--this  is  a  good  thing (if  you  have  an  unlimited  amount  of  money),  but it can   also be a  bad  thing (if  you  don't).   Another  reason is  --they  don't  have  everything  that's  in  their  catalog--I  know,  that's  really  not  a  big  deal.   But  the main  reason  is--their  prices  on   all  of  their  products  are  alot  higher  than  their  online  prices--I  figured  even  with  the  shipping,  I  save  more  when  I  shop  online.  I'm  not  talking  a  dollar  more--I'm  talking  anywhere  from  $3  to  $7.00 more!   But  on  the  up  side--you  can  see  the  actual  colors  of   all  the  paints (and  they pretty  much  have  all of  the  color selections  there too)  and  all  of  the  pens and  markers (you  can  test  them    too).   And  I  know  when  I  go  back  to  Columbus  next  year  or  where ever  there  is  a  Dick  Blick  store ,  that  will  be  the  first  place  I  go  to--I  still   love  going  there.

Okay,  now  on  to  IKEA.  I  was  able  to  find  some  shelving  units there  that  didn't  cost  me  an  arm  and  a leg,  and  I've  been  very  motivated  today  to get  it  put  together  with  the  help  of  my  very  patient  husband.  This  is  what  I  wanted  to  replace--an  old  set  of  shelves  from  my  son  that  he  was  going  to throw  out--it  was  on  it's  last  legs.

So this is the before shot--


--and  here's  the  after--


I   now  have  2  sets  of shelves that  hold  so much  more!  I  also  found  these baskets  at  IKEA  too--they're  great  for  organizing.  I  now  have  all  of  my paints  next  to  my  work  table,  and  also  my  scrapbook  paper pads  were  able  to  fit  in  there.  That's  my  next  goal--to  find  a  better  storage  system  for  all  of  my  many  many  more  loose  scrapbook  and  collage  papers  (other  side  of  the  room).   And  even  though  this  takes  up  basically  the whole  wall,  the  room  seems  bigger  to  me  now.  I'm  happy!!


Now the  giveaway--Joji  Todd  is  having  her  first  giveaway  on   her  blog.  You  will  be  so  happy  to  see  what  she's  giving  away.  Her  work  is  exceptional.  I found  her  blog  a  few  months  ago, and  I  love  her  beautiful  art.  So  just  go  here  to  sign  up.

And  lastly,  I'm  still working  on  my  little  project.   Here's  another  peak--


This  is  one  of  my  newer  stamps.   I'm  pretty  sure  it's  a  Lynne  Perella  stamp--but  correct  me  if  I'm  wrong.   I  found  it  on  my  recent  trip to  New York  at  The Ink Pad--check  out  their  website--you  WILL  be  jealous!   I  was  told  about  this  cool  little  rubber  stamp  store  plus  from  Marlynn.  So  if  you're  ever  in  New York City,  make  sure  you  go--you  won't  be  disappointed.  Thanks  Marlynn!!

Friday, August 20, 2010

Off to Columbus

I'm   leaving  today  for  an  overnight  trip to  the  Columbus  wholesale  cash  and  carry  sale  that  I  told you  about  here,  and  again  my  first  stop  will  be  here--


The  wholesale  show  is  tomorrow,  and  then  after  that  we're  taking  a side  trip  over to  Pittsburgh  to  go  here--


Sorry,  this is the only  image  that I  could  come  up  with--trying  to  be  a  little  creative.  I  want  to look  for  small  storage  units  that  will  be  more  efficient  for  my  art  room  (better take  some  measurements  before  I  leave).  So  as  you  can  see--I'm  going  to have  some  fun  in  the  next  24  hours!

I  don't  have  any  art  to  show  you  right  now  because  I've  been  busy  working  on  a  project  that  I'm  very excited  about.  I'll show  it  to you  all  next  week.  But  for  now--here's  a  little  sneak  peak--


Tuesday, August 17, 2010

Old Skool Somerset (plus a couple of Giveaways that I want to tell you about)

Okay  another  magazine  that  I   took  with  me  on my  little  trip  was  an  old  Somerset  magazine  from  2003!  I  think  I bought  it last  year  or  the  year  before  when  they  have  their  annual   back  issue  sale.  I   think  it  might  be  going  on  right  now  over  at  Stampington.com--you  can  find  some  great  buys.  Well  anyway,  I  found  another   project  that  was  calling  my  name.

Assemblage boxes!

And   usually  when  I  do  these,  I  start  out  with  a  prompt, and  it  will  usually   lead  the  way.  This  time  it  was  these--


These  great  children's  blocks  that  I  had--nicely  aged  and  dirtied  up--like  they  should  be.  And  here's  where  they  led  me--


This one  pretty  much  put  itself  together--I  love  that  when  it  happens.

And   I'm  sure  alot  of   you  know  Rebecca   from  Daisy  Dolls,  and  if  you  don't,  then  you  are definitely  in  for  a  treat--you  have  to   check  out  her  blog.  Well,  she  had  showed  you  on  her  blog  a  gift  that  I  had  given  to  her........and  NOW--I  want  to  show  you  what  she  gave  me  in  return!

This  is  a print  from a painting  that  she  had  done  when  she  returned  from  India  last  year.  Is  this  not  gorgeous!!  And  look  at  the  bead embellishments  that she  added on--all  covered  in resin.  And  how  about that  very  cool  elephant?!  Rebecca,  I'd  say  that  you  captured  the atmosphere  of  India very well--thank  you  so  much!!  It's now  happily  living  with  all of  it's  other  new  friends  in  my  art  room.


And  speaking  of  Rebecca--her  daughter,  Emma Grace  has  a  blog  too, and  she  is  having  her  very  first  giveaway!   Emma  Grace,  you  inspire  me  with  your  enthusiasm  and  creative  spirit!!--don't  ever  loose it!!  So  if  you  haven't  gone  over  and  signed  up  yet--what  are  you  waiting  for?!.........GO!!.......NOW!!

But  before  you  do,  there's   one  more  giveaway  that  I  want  to  mention  to  all of  you  face  addicts--


Jodi Ohl  is  starting  this  new  workshop  at  the  Creative  Workshops  ning  site,  and  she  is  giving  away  a  free one  on  her  blog.  It  starts  in  September,  and  it's  really  tempting  me--let  me tell you.  So  you  can  go  here  to  sign  up  for  it.  Good  luck  on  both  of  these  giveaways!!
 

Friday, August 13, 2010

Inspired by CPS

So   whenever  we  go  on  one  of  our  road  trips,   I  always  grab a  few art  magazines  and   books  that   I  have--whatever  is  laying  around  is  what  goes  with  me.  And  I'm  so glad  that  this  one  ended  up  in  my bag--

This  is  the latest issue, and I've already  read  the  whole  magazine,  but  I  kind of  forgot  about it.  When  I saw what was  on  the  cover  by  artist  Sue  Pelletier,  I  thought--ooooh,  I  want  to do that  too!   And   with  me  having  the  time  to actually read  the article,  I  knew  exactly  what  to  do  when  I  started.  She  calls  it  plaster  collage,   and  that's  how you start  out --with  patching  plaster.  I  didn't  have  that,  so  I  just  used  a  heavy  modeling  paste.


I  love the texture that you get


And  then  when  this  is  all dry  is  when  the real  fun  starts,  and you  can start  collaging  and  layering--

You  can  click  on  this  for  a closer  view--you  can  really see the texture.


So  I  want  to  say  Thanks  to  Sue!  She's  a  frequent  contributor  to  CPS,   and  I'm  VERY  partial  to her style--so  go  check  out  her  blog.

And  I  also  wanted  to  show  you  this--

 Okay,  I  found  this  little  round  globe (just  the  globe)  laying  on  a table  at  a garage  sale  a  few  months  ago.  The  people  who  were  having  the sale  didn't  even  know where  it  came  from,  so  they  gave  it  to  me.  And  then  I  attached  it  to this  metal  green  base.  I'm  not  even  sure  what  it  is,  and  I've  had  it  forever  (see--- don't  throw  anything out!)  And   now that  I   have  all   of  these beautiful  maps  that  I  showed  you  here  (you  can  probably  guess where  I'm  going  with this)  I had  to  make  this--


I  just  added  some  postage  stamps  and  some  old  coins!

And  guess  what  guys--I'm  writing  this  post  on  my  NEW  "bell"  laptop.  The  only  thing  that  wasn't  broken  on  the other one,  pretty  much,  was  the  hard  drive (all of  my stored  memory),  which  I was  very  grateful  for--so  we  were  able  to transfer  the hard drive  over  to this  new  one.  The first  thing  I'm  going  to  get  is an external  hard  drive.  A  year  ago, I  didn't  even  know  what  that  meant,  but  I sure do  now,  and  I'm  not  taking  any  chances!

LinkWithin

Related Posts with Thumbnails